This article covers the following areas –
- Perfect Space for Blue Star Fern
- Water for Optimal Hydration
- Feed for Healthy Growth
- Prune for Good Growth & Appearance
- Repot for a Happy Plant
- Propagate to Multiply Collection
- Dealing with Pests and Diseases
- Additional Tips for a Happy Blue Star Fern
- Final Note
- Frequently Asked Questions
- Get to Know Your Blue Star Fern
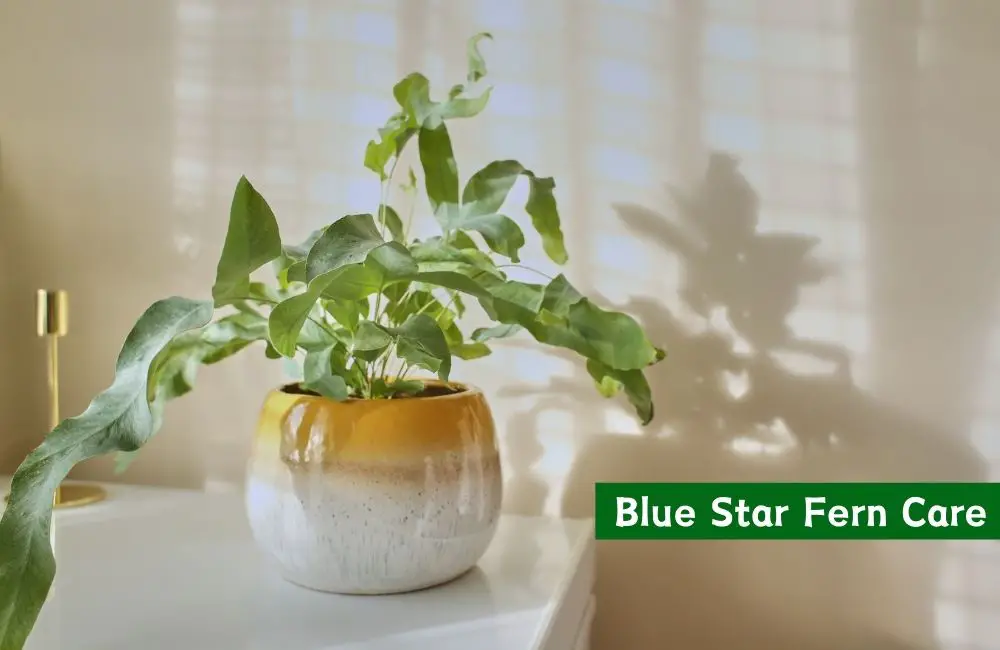
As a Blue Star Fern lover, I’m excited to share everything I know about caring for this beautiful plant. Trust me, once you get the hang of it, you’ll see these ferns, which are a fantastic addition to your indoor plant collection. So, let’s dive into the wonderful world of Blue Star Ferns.
For blue star fern care, place them in indirect light and ensure humidity and water when the top inch of soil dries. You should apply half-strength liquid fertilizer monthly during growth and prune dead fronds. Moreover, repot them with a well-draining mix and orchid bark when required.
Now, let me share some tips on how to take good care of your Blue Star Fern. I have been living with this variety for so many years and have learned about all the ins and outs of it.
Perfect Space for Blue Star Fern

Place the perfect spot for your Blue Star Fern in indirect light to avoid burning the fronds. Ideal locations include north or east-facing windows. Maintaining humidity is crucial, which can be achieved using pebble trays, regular misting, a nearby humidifier, or grouping with other plants.
Blue Star Ferns thrive in indirect light, making a north or east-facing window an ideal location. Direct sunlight can harm the fronds, so it’s best to avoid it. The right light will help your fern grow lush and healthy without any risk of burning.
Maintaining humidity around your fern is essential, as it loves a moist environment. A bathroom with a window is a perfect spot because it provides both indirect light and natural humidity. If placing it there isn’t an option, other ways exist to create a humid environment.
One effective method is to use a pebble tray filled with water. Place your fern pot on top of the tray, ensuring the pot’s bottom doesn’t touch the water directly. This setup allows the water to evaporate around the fern, creating a humid microclimate.
Regular misting is another simple way to maintain humidity. Mist your fern lightly with water a few times a week. This helps keep the leaves moist and mimics the fern’s natural environment. Just be sure not to overdo it to avoid waterlogging the soil.
Using a humidifier near your fern can also be beneficial. This device increases the overall humidity in the room, which is perfect for tropical plants like the Blue Star Fern. Lastly, grouping your fern with other plants can help maintain a humid environment, as plants naturally release moisture.
Water for Optimal Hydration

Ensuring optimal hydration for your Blue Star Fern is crucial for its health and growth. Keep the soil consistently moist, but avoid overwatering. Check soil moisture regularly by inserting your finger about an inch deep. If it’s dry, water the soil directly until water drains out of the pot. Use a well-draining potting mix and adjust watering based on the season.
Consistent moisture is vital for your Blue Star Fern. To check if your plant needs watering, insert your finger about an inch into the soil. If it feels dry at that depth, it’s time to water. This simple test helps maintain the right moisture level without overwatering.
When you water your fern, focus on the soil rather than the fronds. Pouring water directly onto the soil ensures that water reaches the roots effectively. Watering the fronds can trap water between them, causing fungal issues.
A well-draining potting mix and a pot with drainage holes are essential. These features prevent water from sitting at the bottom of the pot, which can cause root rot. Water your plant until water drains out of the bottom, ensuring thorough hydration.
Adjust your watering routine based on the season. Your fern will need more frequent watering as it grows in spring and summer. In fall and winter, its growth slows down, and you can reduce watering frequency to prevent overwatering.
Feed for Healthy Growth

Fertilizing your Blue Star Fern ensures it gets the necessary nutrients to thrive. Use a balanced liquid fertilizer, such as a 10-10-10 or 20-20-20 formula, diluted to half the recommended strength. Apply fertilizer once a month during the growing season to support active growth. Monitor the fern’s health to adjust feeding as needed.
Choosing the right fertilizer is essential. Opt for a balanced liquid fertilizer, such as a 10-10-10 or 20-20-20 formula. These provide equal parts nitrogen, phosphorus, and potassium, which are crucial for your fern’s growth. A water-soluble fertilizer makes application easier and more effective.
Diluting your fertilizer before application is critical. Blue Star Ferns have delicate roots that can be damaged by strong fertilizer solutions. To prevent root burn, dilute the fertilizer to half the recommended strength on the package. This ensures your fern receives nutrients without the risk of damage.
Timing is also crucial when fertilizing. Feed your Blue Star Fern during the growing season (spring and summer) when it is actively growing. Fertilizing once a month during this period provides consistent nourishment, helping your fern to thrive. In the cooler months, reduce or halt fertilization as the plant’s growth slows down.
Regularly monitor your fern’s health to adjust feeding as needed. Healthy, vibrant leaves and steady growth indicate proper fertilization. If you notice yellowing leaves or slowed growth, your fern may need more nutrients. Conversely, browning leaf tips or dropping leaves can signal over-fertilization. By observing your plant’s responses, you can fine-tune its feeding regimen for optimal health.
You’ll create a nurturing environment that encourages strong, healthy growth by carefully monitoring your Blue Star Fern’s watering and feeding needs. Remember that every plant is unique, so adjustments may be necessary based on specific needs and conditions.
Prune for Good Growth & Appearance

Pruning is essential for maintaining a lush and vibrant Blue Star Fern. It enhances the plant’s appearance, promotes better air circulation, and encourages new growth. Use clean, sharp scissors or pruning shears to avoid damage and prevent disease spread. Inspect your fern regularly for pests or diseases, and consider wearing gloves to protect your hands from the fronds’ rough texture.
To start, ensure your pruning tools are clean and sharp. Using dull or dirty scissors can damage the fern and increase the risk of spreading diseases. Sterilize your tools before each use by wiping them with rubbing alcohol or a bleach solution.
Regular inspection of your fern is crucial. Look for signs of pests, such as tiny holes or discoloration on the fronds. Also, check for diseases that may appear as spots or unusual patterns. Pruning affected areas promptly can prevent the problem from spreading to healthy parts of the plant.
When pruning, focus on removing dead or yellowing fronds. These can harbor pests and diseases and divert energy from new growth. Trim these fronds close to the base, making clean cuts to encourage healthy regeneration. Also, thin out any overly dense areas to improve air circulation, which helps prevent fungal infections.
Consider wearing gloves while pruning your fern. The rough texture of the fronds can be abrasive and may cause minor skin irritation. Gloves provide protection and make the pruning process more comfortable.
Following these tips’ll keep your Blue Star Fern healthy, attractive, and thriving. Regular pruning, combined with proper care, ensures your fern remains a beautiful and vibrant addition to your indoor garden.
Repot for a Happy Plant

Repotting your Blue Star Fern is essential for its healthy growth and propagation. Follow these tips to ensure a successful repotting process. Water your fern thoroughly a day before repotting, gently loosen the root ball, inspect and trim damaged roots, and use a well-draining potting mix. Press the mix gently around the plant for stability.
Watering your fern thoroughly a day or two before repotting makes the process easier and less stressful for the plant. Well-hydrated roots are more pliable and easier to handle, reducing the risk of damage during repotting.
When you’re ready to repot, gently loosen the root ball with your fingers. Remove any excess or compacted soil around the roots to help them spread in their new pot. This step encourages healthier root growth and better nutrient absorption.
Inspect the roots for signs of rot or damage. Healthy roots should be firm and white. Using clean, sharp scissors, trim away any brown, mushy, or damaged roots to prevent the spread of disease and promote new root growth.
Add a layer of potting mix at the bottom of the new pot to ensure proper drainage. This helps prevent water from pooling at the pot’s base, which can lead to root rot. Place the fern on top of this layer, ensuring it’s centered and at the right depth.
Press the potting mix gently around the plant to provide stability, but avoid compacting the soil too much. Loose soil allows for better air circulation and root growth, ensuring your Blue Star Fern thrives in its new environment.
Following these steps will create a nurturing environment for your Blue Star Fern, promoting healthy growth and ensuring it remains a beautiful addition to your home.
Propagate to Multiply Collection

Propagating your Blue Star Fern allows you to expand and share your plant collection with friends and family. Choose the healthiest parts of your fern for propagation, lightly water newly potted divisions, monitor for stress, and be patient as they establish. Follow care guidelines for mature ferns once they are well-established.
Start by selecting your fern’s healthiest and most vigorous parts for propagation. These sections have a higher chance of developing into strong, independent plants. Look for lush, green fronds and robust root systems to ensure successful propagation.
After dividing your fern, lightly water the newly potted divisions for the first few weeks. Gradually increase the amount of water as the plants begin to establish themselves. Overwatering can stress the young plants, so it’s crucial to let them adjust gradually to their new environment.
Closely monitor the new plants for signs of stress, such as wilting or yellowing fronds. Adjust their care as needed to encourage healthy growth. This might include adjusting their light exposure, humidity levels, or watering frequency to better suit their needs.
Be patient with your new ferns. It may take several weeks or even months for the new plants to establish themselves fully and start producing new fronds. This slow and steady growth is normal, so give them time to adapt and develop.
Once your propagated ferns are well-established, follow the same care guidelines as for mature Blue Star Ferns. This includes providing indirect light, maintaining humidity, and regular watering. With proper care, your new ferns will thrive and become beautiful additions to your collection.
Dealing with Pests and Diseases
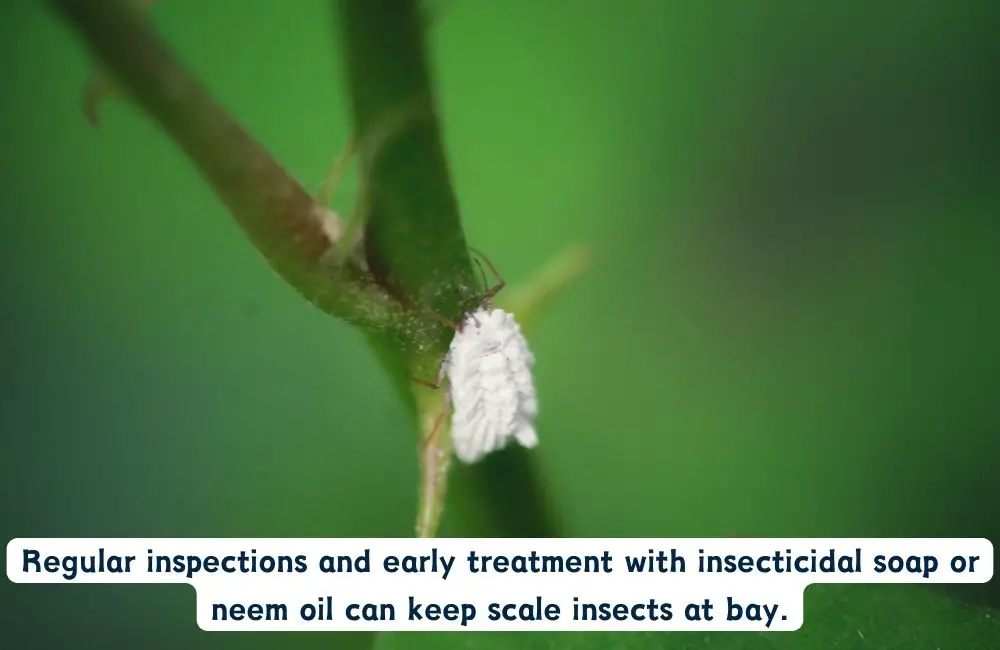
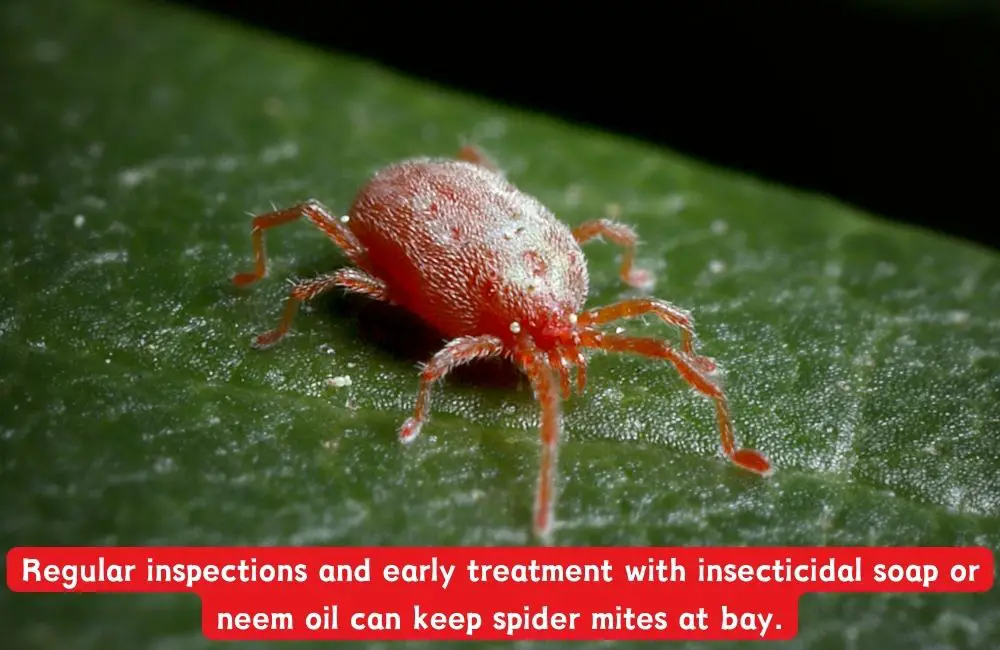
Even well-cared-for Blue Star Ferns can attract pests or become susceptible to diseases. The most common pests are mealybugs, scale insects, and spider mites. Look for signs like sticky residue on leaves or tiny bugs on the fronds. Tackle pests by wiping leaves with a damp cloth, using insecticidal soap or neem oil, and isolating the fern from other plants until resolved.
To handle small infestations, wipe the leaves with a damp cloth. This simple method can effectively remove mealybugs and spider mites, preventing them from spreading. Regularly inspect your fern to catch infestations early.
For larger infestations, use insecticidal soap or neem oil. These treatments are effective against various pests and are safe for your fern. Follow the product instructions carefully to ensure the best results. Apply the treatment to all parts of the plant, focusing on the underside of the leaves where pests often hide.
Isolation is crucial when dealing with an infested plant. Keep your Blue Star Fern away from other plants until the issue is resolved. This prevents pests from spreading to your other plants, making it easier to manage the infestation.
In terms of diseases, the Blue Star Fern is relatively hardy. However, the most common issue is root rot, which occurs when the plant is overwatered. Root rot is characterized by yellowing leaves and mushy roots. To prevent root rot, ensure your fern is in a well-draining potting mix and avoid letting the roots sit in water.
Remove the plant from its pot and inspect the roots if you suspect root rot. Trim away any affected areas with clean, sharp scissors. Repot the fern in fresh, well-draining soil, and adjust your watering routine to allow the soil to dry out slightly between waterings.
You can keep your Blue Star Fern healthy and thriving by staying vigilant and addressing pests and diseases promptly. Regular inspections, proper care, and timely interventions will ensure your fern remains a beautiful addition to your home.
Additional Tips for a Happy Blue Star Fern
Now that we’ve covered the basics let’s wrap up with some extra pointers to keep your Blue Star Fern thriving:
- Rotate your fern every few weeks to ensure even growth and prevent one side from getting more light than the other.
- Maintain a stable temperature around your fern between 60-75°F (16-24°C) to create an ideal environment.
- Avoid cold drafts or sudden temperature changes as these can stress your fern and affect its health.
- Be patient, as the Blue Star Fern can be a slow grower. Consistent care will eventually lead to a lush, vibrant plant.
Following these extra pointers and the basic care guidelines will create the perfect conditions for your Blue Star Fern to flourish. Rotate your fern to promote balanced growth and keep the temperature steady to provide a comfortable environment. Avoid exposing your plant to cold drafts, as sudden changes can cause stress and damage.
Patience is key when it comes to growing a Blue Star Fern. It may not grow rapidly, but with consistent care and attention, you’ll be rewarded with a beautiful, thriving plant that adds a touch of greenery to your space. Keep these tips in mind, and enjoy nurturing your fern.
Final Note
Caring for a Blue Star Fern is not as tough as it may seem. By using this guide and gaining experience, you can become an expert in caring for this plant. Have fun looking after it and see how it enhances your indoor surroundings.
Happy planting!
Frequently Asked Questions
The best light conditions for a Blue Star Fern are indirect light. Avoid placing the fern in direct sunlight, which can burn the fronds. A north or east-facing window is ideal for providing the right amount of light.
A Blue Star Fern should be watered when the top inch of soil feels dry. Water the soil directly until it drains from the bottom of the pot. To prevent root rot, keep the soil consistently moist but avoid overwatering.
The ideal temperature range for a Blue Star Fern is between 60-75°F (16 and 24°C). Maintaining this temperature range ensures the fern thrives. Avoid exposing the fern to cold drafts or sudden temperature changes.
Humidity levels for a Blue Star Fern can be maintained by using a pebble tray filled with water, misting the plant regularly, placing a humidifier nearby, or grouping it with other plants. These methods help create a humid environment that the fern loves.
A Blue Star Fern should be fertilized during the growing season (spring and summer). A balanced liquid fertilizer, diluted to half the recommended strength, once a month. This provides the necessary nutrients for healthy growth.
To deal with pests on a Blue Star Fern, wipe the leaves with a damp cloth for small infestations. For larger infestations, use insecticidal soap or neem oil. Isolate the fern from other plants until the pest issue is resolved.
The best way to repot a Blue Star Fern is to water it thoroughly a day or two before, loosen the root ball gently, inspect and trim any damaged roots, and use a well-draining potting mix. Press the mix gently around the plant for stability.
A Blue Star Fern can be propagated by choosing the healthiest parts of the plant for division, watering the new divisions lightly at first, and monitoring them for stress. Be patient as the new plants establish themselves and start to grow.
The most common disease affecting Blue Star Ferns is root rot, caused by overwatering. To prevent root rot, use a well-draining potting mix, avoid letting roots sit in water, and water the plant when the top inch of soil is dry.
To prune a Blue Star Fern for better growth, use clean, sharp scissors to remove dead or yellowing fronds and thin out dense areas. This improves air circulation and encourages new growth. Regular pruning keeps the fern healthy and attractive.
Get to Know Your Blue Star Fern
| Indicator | Blue Star Fern (Phlebodium aureum) |
|---|---|
| Family | Polypodiaceae |
| Genus | Phlebodium |
| Species | P. aureum |
| Common Name | Blue Star Fern |
| Origin | Tropical Americas |
| Plant Type | Perennial, Indoor Plant |
| Mature Size | 1-2 feet in height and spread |
| Growth Rate | Moderate to Fast |
| Light Requirements | Low to Medium, Indirect Light |
| Watering Requirements | Moderate, Keep Soil Moist |
| Soil Preference | Well-draining, Rich and Humus Soil |
| pH Preference | 5.5-6.5 (Slightly Acidic) |
| Temperature Tolerance | 60-75°F (15-24°C) |
| Humidity Tolerance | High Humidity (60-80%) |
| Fertilization | Light, Every 2-3 Months |
| Propagation | Division of Rhizomes or Spores |
| Pests | Mealybugs, Scale Insects, Mites |
| Diseases | Root Rot, Leaf Spot, Fungal Diseases |
| Toxicity | Non-toxic to humans and pets |
| Special Features | Air-purifying, Unique Leaf Shape |
| Popular Uses | Indoor Houseplant, Terrarium Plant |